Tuesday, February 24, 2009

TWD Caramel Crunch Bars

Posted by BAKE-EN at 4:05 PM 15 comments


Whitney of What's left on the table? chose Caramel Crunch Bars as this week's TWD recipe. I made these delicious bars a while back and sandwiched them with ice cream. They were truly decadent. Today, I made a half batch knowing how addictingly good they would be. There's no sense in setting myself up to eat a 9x13 pan of these goodies.

One thing most people don't know about me is that though I am a pastry chef, I can't find a thing at the grocery store. Honestly, I used to know my way around a grocery store till I move to St. Helena. Anyone who's ever been to the Stop and Shop (or is it a Star market?) knows what I'm talking about. The butter is in the beer isle. THE BUTTER IS IN THE BEER ISLE!!!! That makes no sense at all, and one day I spent a good 15 minutes looking for butter! Once I finally got used to grocery stores in Northern California, we moved back to Boston, so here I am lost once again. The only place where I can get in and out quickly is Trader Joe's, and that's only because it's so small. All that being said, I decided that rather than spending an hour looking for Heath Toffee bits at the grocery store, I would be better off making toffee at home. I'm not sure where I got this recipe, but it's pretty good, and really easy. The only change I would make for next time is to cook it a little longer. I cooked the candy to 294F, but I think I should have gone up to at least 300F. After reading some recipes afterwards I discovered some people cook their toffee to as high as 310F. Here's the recipe I used:

½ # Butter

1 cup Sugar

1 Tbsp Corn Syrup

1 tsp Kosher Salt

3 Tbsp water

Method: Put it all in a heavy bottomed pan. Stir frequently and bring mixture to 300 degrees (see above). Pour onto a silpat and let harden.

This toffee recipe will make more than enough toffee for the caramel crunch bars (full size).


The recipe for the bars is super easy. Basic creaming method followed by vanilla extract then dry ingredients and chopped chocolate. I love that this recipe calls for instant espresso powder for two reasons. One is that the bitterness of the espresso powder balances the sweetness of the bar itself. Second I'm happy to be using one of the obscure items in my pantry.

These bars are very good. I think I prefer them sandwiching vanilla ice cream then on their own though. Next time I make them with the intention on serving them as bars, I will use less chocolate on top and I'll sprinkle some sea salt in addition to toffee on top of the bars.


Tuesday, February 17, 2009

Madeleine Patisserie NYC

Posted by BAKE-EN at 4:54 PM 1 comments


Madeleine Patisserie in NYC on 23rd Street is charming. It's one of those cute places that you want to put in a box and keep all to yourself. I was lucky enough to go there and enjoyed a huge crunchy almond croissant with a piping hot cup of coffee. 10:00 AM seems to be a great time to go there because I easily found a cozy seat in the cafe area (it was a weekday). The almond croissant was the twice baked variety which I really like. If you place your order to stay they give you a cute silver tray with your goodies on it.

One important thing to mention about Madeleine is that though they do have an impressive array of Madeleines; the real draw is their huge selection of french macaroons. They can have up to 25 types of macaroons lining their silver trays in an impressive array of colors on any given day. My personal favorites were the caramel fleur de sel and almond. I forgot to take pictures of them before we dove in! Here are the remnants of the lavender-nougat, almond and chocolate.


A Lobster claw even a vegetarian could love

Posted by BAKE-EN at 2:25 PM 0 comments


Joe and I stopped by Modern bakery in Medford before a long weekend in Vermont a few weeks ago. Joe lived up to his (well deserved) reputation of always ordering the most extravagant thing on a menu. Weighing in a what felt like 5 pounds Joe purchased a gigantic lobster claw filled with custard. He loved it, but it was even too much for Joe to handle. He only ate about 1/4 of it before declairing defeat. I got a slice of ricotta pie which was a little too sweet for me.

Tuesday, February 10, 2009

TWD Floating Islands

Posted by BAKE-EN at 5:20 PM 8 comments


Floating Islands have always perplexed me. When I think of the islands, I envision blue skies, teal sea water and luscious brightly colored fruit. Why then, is the traditional floating island such a bland looking dessert? White meringues floating on beige anglaise is tasty, but kind of boring to look at. Today I decided to vamp up my floating islands by first poaching them in milk infused with toasted coconut, then floating the meringues atop a pinapple sage soup.

I did follow Dorie's recipe for the meringues which were easy to make and to poach. For the poaching liquid, I toasted some shredded coconut (about ¾ cup), and I infused some skim milk with the toasted coconut. I did that by bringing the milk with the toasted coconut in it to a boil and then turning the heat off and letting it infuse for about 30 minutes. Next I strained my milk/coconut mixture and poached the islands. I was immediately unimpressed with the meringue. I don't know if I only like Italian meringue, or if my whites weren't that great, but all I could taste was egg after poaching. I also tried poaching them for different periods of time, but that didn't seem to help. Once I was done poaching liquid, I strained it again, so I could use it in the soup. For the pineapple sage soup, I pureed a quarter of a pineapple with a sage leaf and pureed it in a food processor. Next I added some brown sugar and the flesh and juice of a blood orange, a pinch of salt, the coconut infused milk and a couple good sized spoonfuls of yogurt to give it more tang. Once that was fully pureed, I strained the soup and refrigerated it. While I was doing all that I diced some pineapple, tossed it in turbinado and baked it till caramelized (like candy). I also, cut thin slices of pineapple and dried them out in the microwave.


I love the soup that I made. All of the components worked beautifully together. I dropped the candied pieces of pineapple in the soup right before serving. I was hoping they would float, but they fell to the bottom so you can't see them in the picture. They were a lovely addition of texture to the soup. The soup was great, but I didn't feel the same way about the islands. They were way too eggy for me. Unless I hear countless rave reviews from other TWDers I won't make these again.


Tuesday, February 3, 2009

TWD Baked or Unbaked Deliciousness

Posted by BAKE-EN at 8:22 PM 17 comments


World peace cookie dough is the best unbaked dough I've ever made at home.** Friends who knows me really well (especially in a work environment) know the years of research and caloric intake it took to make such a bold statement. Prior to culinary school I was a bit squeamish about tasting anything raw, but my friend and schoolmate Erin clued me in to how good doughs and batters were raw. Erin even went so far as to eat raw yeasted dough-more than once! (Side note-Erin, maybe you're actually growing a chocolate cherry loaf in your belly?) Thanks to Erin, I've been trying raw cookie dough ever since and I'm proud to say that I think it's made my immune system stronger!

So yes, World peace cookies are amazing raw (no raw eggs to worry about either, so you can go crazy). They are also amazingly simple to put together. Good ingredients are key to making these cookies amazing.


I made my cookies with Valrhona cocoa powder, fleur de sel from Brittany and a combo of Scharffenberger 70% and Callebaut milk chocolate. Those ingredients with fresh butter and King Arthurs flour combined to create an addicting chocolate cookie.


The salt in these cookies really brightens the flavors of the chocolate, and makes them feel more "adult." Thanks to Jessica of Cookbookhabit for chosing this recipe. You can find the recipe at her website.


**Sofra employees know that the best unbaked cookie dough in a bakery is either Maureo or Chocolate Chunk (the debate will never end-they are both that good).


Sunday, February 1, 2009

Pizza Chronicles 2009 Part 1

Posted by BAKE-EN at 7:51 AM 3 comments


If there's one thing Joe and I agree on for dinner its pizza. While making pizza last night we realized how much value we get from making it together and an idea was born. This year, we're going to chronicle our pizza experiences. I'm sure there will be some interesting doughs, toppings, take-out places and restaurants involved. Even more fun will be us working together on this. We'll share our thoughts on the pizza "du jour" and any insights (or weight gain) will be noted.

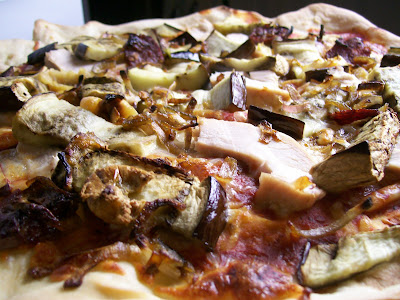
Our first pizza of 2009: Eggplant, caramelized onion, chicken, chorizo and whole roasted smashed garlic clove pizza with shredded mozzarella cheese and Trader Joe's pizza sauce.

Michelle on the dough:

My current favorite pizza dough is from Nick Malgieri's How to Bake. His recipe for Neapolitan pizza is quick to make and with a proof time of about an hour it's becoming one of my go-to recipes. Aside from the ease of making this dough it has great flavor and it produces a pizza that is crispy with a nice crust around the edge.

Here's an abbreviated version of that recipe (makes 2 12" pizzas):

1 ¼ Cups Warm Tap Water (about 110 degrees)

2 ½ tsp (1 envelope) active yeast (I like SAF yeast)

Put the warm water in a bowl. Sprinkle the yeast over the water; let it soften for 3-4 minutes.

While yeast is softening, in a large bowl combine:

3 Cups AP Flour (we only use King Arthurs)

2 tsp salt

Mix them together. Make a well in the center of the flour mixture. Once the yeast has softened whisk the yeast and the water together, then whisk in:

1 tbsp Olive Oil (use the good stuff)

Once you have the oil, water and yeast mixed pour them into the well in the flour. With a spatula mix the flour water together as far as you can (it may start to form a soft, sticky dough; if it doesn't take your hands and kneed it a few times in the bowl to get everything incorporated). Turn the dough onto a lightly flour surface and kneed it till the dough is smooth and no longer very sticky. It should take about 5 minutes. Be careful not to overknead because the dough will be tough. Form the dough into a ball.

Put the dough in a bowl with about 1 tbsp of olive oil in it. Place the dough into the bowl, and move it around so all the dough is covered with oil. Make sure the top of your ball is facing upwards and wrap the bowl with plastic wrap. Allow the dough to double in size (about 1 hour).

Once your dough has fully proofed, take it and divide it in half. This recipe makes 2 medium pizzas, so I often freeze half the dough. Take the dough you will be using and form it into a ball. Let it rest for about 10-15 minutes with a towel covering it, then stretch it to approximately the size of your pizza stone (or pan). We don't have a pizza peel, so we take our stone out of the oven, put our dough on it; and then quickly put the toppings on before putting it back in the oven.

Joe on the toppings:

On this pizza we used Trader Joes Pizza Sauce. Although we never use gravy from a can for pasta, we've found that for pizza Trader Joe's sauce works great. This sauce has a good consistency for pizza, and when used judiciously, still allows for a very crispy crust. We use a small amount, not covering the whole crust, leaving it streaky before the other toppings go on. The next topping to go on were four cloves of whole roasted garlic that we smashed. They were roasted in the skin, and peeled right before application. Also added were caramelized onion (low and slow till caramelized in a pan), broiled chicken breast (roasted bone in and cut into strips), a couple small pieces of chorizo, and shredded Mozzarella. For Mozzarella we prefer fresh, but store bought grated is good in a pinch, or to save a little cash. The final topping and our favorite right now, was roasted eggplant. We simply cut the eggplant the long way into sections and then crosswise just over half an inch thick. We then oil and salt them and roast in a 400 degree oven until just before done (they'll start to brown and be soft, but not mushy). When the pizza comes out, they will have the slightest amount of crisp on the outside, but be creamy in the middle. Roasting them first gets them to perfect doneness, and also decreases their moisture content, allowing the pizza to be crispy.

The verdict:


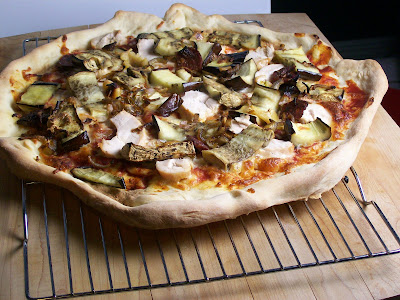
You'll know your pizza is done when the edges are brown, cheese is melted and it smells so good you can't stop opening the oven door to check on it. We've made several variations of this pizza and it's so good. When we take our pizza out of the oven we slide it onto a cooling rack so that the crust will stay crispy. We've found that if we put it on the cutting board right away the steam will get trapped and the crust will get soggy.


With our pizza tonight we had a bottle of Michel-Schlumberger 2003 Syrah from Dry Creek. Though the wine was very nice it was a bit too hot and peppery to pair with the pizza. The flavors were competing a bit too much, and the pizza overpowered the wine. Our glass before the pizza was lovely, but with the pizza it just tasted hot. Next time we drink that bottle we'll pair it with a lightly seasoned pork tenderloin so we can enjoy the flavors of the wine more.


Bake-En Copyright 2009 Sweet Cupcake Designed by Ipiet Templates Image by Tadpole's Notez