Tuesday, May 27, 2008

TWD Pecan Honey Sticky Buns

Posted by BAKE-EN at 5:34 AM 28 comments
This weeks TWD recipe was Pecan Honey Sticky Buns. I decided to make them for the the morning after our friends' annual bocce tournament. Due to time constraints I have to keep this post super short, but here are some thoughts on this recipe.

1. I would marry these sticky buns if I could.

2. I think my friends would marry me if I promised to make sticky buns for them daily till death do we part.

3. Move over Salt & Vinegar potato chips, Dorie's sticky buns are my latest hangover cure! Don't worry coffee, you're irreplacable.

I had a lot of fun making these, but even more fun sharing them with my friends this morning. Thanks to Mike and LT for hosting yet another amazing party. Congrats to LT for finishing her first half marathon by 10:30, playing bocce by noon and staying up till just before midnight. You are my hero :)

Here are pictures of the sticky buns from start to finish:

The brioche dough mixing:


Brioche after mixing:


The next day, dough rolled out:


Butter, cinnamon and sugar added:


Rolled up dough:


At this point, I froze the dough and then took it out the day before I baked it off.

The rolls before proofing:


After proofing and right before going in the oven:


Here are the beautiful results:


The last piece:

Tuesday, May 20, 2008

TWD Traditional Madeleines & a side of croissant

Posted by BAKE-EN at 9:37 AM 25 comments
There’s something about Madeleines that I love. To me, they are simply the most beautiful baked good; part cookie, part cake; usually scented with a touch of lemon. They were one of my favorite things to bake when I worked at Bouchon bakery.

As with many recipes, I already have a favorite Madeleine recipe. My go-to recipe was posted in Gourmet magazine back in 2006. It has honey, and the flavor is absolutely perfect, sweet yet delicate. Knowing how great all of Dorie’s past recipes have been, I was excited to see how the recipes compared.

The recipe itself was extremely easy. Whip eggs with sugar/lemon mixture till light, fold in dries, then fold in melted butter. I love recipes that take less than a few minutes to make. I piped the batter into my Madeleine molds because it is so much easier (and cleaner) than plopping spoonfuls in. I have what I think are traditional sized madeleine pans, but my yield was more than 12. I ended up with 20 Madeleines. Then I had to wait 3 hours to bake them off.


Tick Tock, Tick Tock…

As luck would have it, I had something to bake off while I was waiting for my Madeleines to chill.


Last week, I made the croissant dough from Baking with Julia. This morning I shaped them into crescent shapes, and then set them aside to proof. My kitchen is extremely cold (aside from the oven, there’s no heat in it). The recipe said it would take 3 to 4 hours to proof. They actually took 6 hours before they were fully proofed. We went from having afternoon tea with fresh croissants, to having a dinner of croissants sandwiched with gruyere and ham with a side salad. Believe me when I say, they were worth the wait. Absolutely amazing flake and so buttery. I used Plugra (butter), which made them stand out even more. I’ve already eaten one and a half croissants and they’ve been out of the oven for only an hour. I better put some in the freezer soon, or else I’m will be feeling very guilty tomorrow. My only problem with the croissants is dissatisfaction with the person who shaped them (me), they look a bit like crabs.


Back to the Madeleines.


They baked in 11 minutes. Once they were out of the oven, I played around with them a bit. Chocolate on some, a lemon glaze on others and confectioners sugar on the rest. The overall flavor of the madelines was nice. They were more cookie than cake; I like them the other way around.


I prefer the recipe from Gourmet to this Madeline recipe. Unfortunately, I'm not the only person with an opinion in my household :) My husband loved this recipe declaring it "the best Madeleine he's ever had." Looks like I'll be making these again.

Here's the recipe for Traditional Madeleines:

2/3 cup all-purpose flour
¾ teaspoon baking powder
Pinch of salt
½ cup sugar
Grated zest of 1 lemon
2 large eggs, at room temperature
2 teaspoons pure vanilla extract
¾ stick (6 tablespoons) unsalted butter, melted and cooled
Confectioners' sugar, for dusting

Whisk together the flour, baking powder and salt.

Working in a mixer bowl, or in a large bowl, rub the sugar and lemon zest together with your fingertips until the sugar is moist and fragrant. Add the eggs to the bowl. Working with the whisk attachment, or with a hand mixer, beat the eggs and sugar together on medium-high speed until pale, thick and light, 2 to 3 minutes. Beat in the vanilla. With a rubber spatula, very gently fold in the dry ingredients, followed by the melted butter. Press a piece of plastic wrap against the surface of the batter and refrigerate it for at least 3 hours, or for up to 2 days. This long chill period will help the batter form the hump that is characteristic of madeleines. (For convenience, you can spoon the batter into the madeleine molds, cover and refrigerate, then bake the cookies directly from the fridge; see below for instructions on prepping the pans.)

GETTING READY TO BAKE: Center a rack in the oven and preheat the oven to 400 degrees F. Butter 12 full-size madeleine molds, or up to 36 mini madeleine molds, dust the insides with flour and tap out the excess. Or, if you have a nonstick pan (or pans), give it a light coating of vegetable cooking spray. If you have a silicone pan, no prep is needed. Place the pan(s) on a baking sheet.

Spoon the batter into the molds, filling each one almost to the top. Don't worry about spreading the batter evenly, the oven's heat will take care of that. Bake large madeleines for 11 to 13 minutes, and minis for 8 to 10 minutes, or until they are golden and the tops spring back when touched. Remove the pan(s) from the oven and release the madeleines from the molds by rapping the edge of the pan against the counter. Gently pry any recalcitrant madeleines from the pan using your fingers or a butter knife. Transfer the cookies to a rack to cool to just warm or to room temperature.

If you are making minis and have more batter, bake the next batch(es), making certain that you cool, then properly prepare the pan(s) before baking.

Just before serving, dust the madeleines with confectioners' sugar.

makes 12 large or 36 mini cookies

serving: Serve the cookies when they are only slightly warm or when they reach room temperature, with tea or espresso.

storing: Although the batter can be kept in the refrigerator for up to 2 days, the madeleines should be eaten soon after they are made. You can keep them overnight in a sealed container, but they really are better on day 1. If you must store them, wrap them airtight and freeze them; they'll keep for up to 2 months.

Tuesday, May 13, 2008

TWD Florida Pie

Posted by BAKE-EN at 10:28 AM 24 comments
Dianne of Dianne’s Dishes chose Florida Pie as the TWD recipe for this week.


On first inspection of the recipe, I knew I had to tweak it. I’m not a fan of shredded coconut. I was the kid who two months after Halloween had a bag full of Mounds and Almond Joys, and nothing else left. I would end up giving my coconut tainted candies to my Memere because she loved them. I do love the flavor of coconut though. I love sticky rice and pina coladas. When I was first going over the recipe I considered boiling the cream with the coconut, and then straining the coconut out. After much internal deliberation, I decided to skip the step all together because I love the flavor of Key Limes, and I knew the pie would be tasty without the coconut.


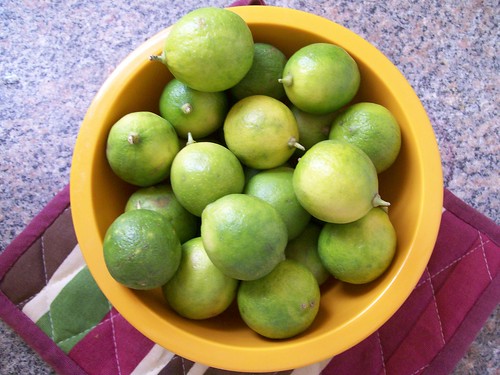
I debated buying Key lime juice over juicing them myself, but I find bottled Key lime juice to be sulphery. Wow, I never could have anticipated just how fun juicing Key Limes is! That was tedious, but those little limes actually contained a lot of juice. I bought a one pound bag of Key Limes, and used all but 5 of them. Key limes are so cute!


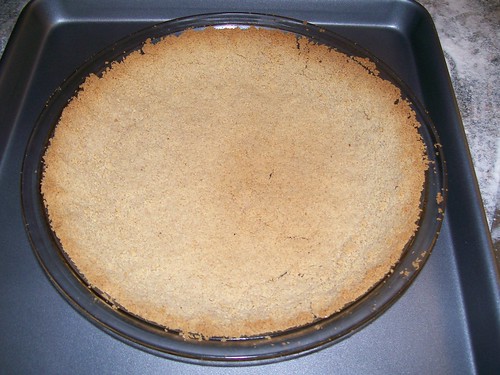
After juicing the limes, things started to get a bit hairy. As directed, I bought a premade graham cracker crust. As I opened the container I realized it was broken in several places. Taking this as an opportunity to try the crust (it was broken anyway), I determined it was flavorless and unimpressive. Turning a lemon into lemonade, I knocked the crust out of the tin, crushed it, and then added ginger, nutmeg, allspice, cinnamon and some melted butter. Then I baked that crust in a pie plate for about 10 minutes at 350.


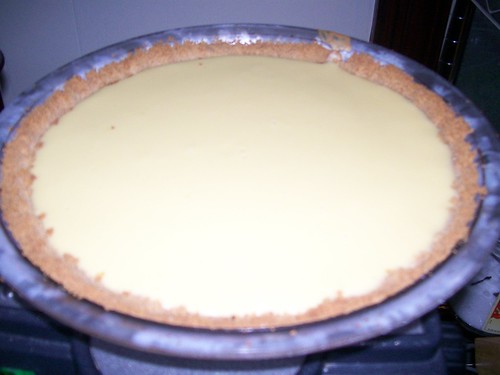
The key lime filing was a breeze to make. Three ingredients: juice, yolks and sweetened condensed milk.


It doesn’t get much easier than that... until...


THE POWER GOES OUT!


Well, it wasn’t all the power. Actually, the outlets still had power, but we had no lights in our apartment at all. Ugh, we live in a very old house in Somerville, and it’s “charm” is wearing thin with all the problems we’ve had here!


By candle light, I filled the pie and put it in the oven. Then as directed, I set it out to cool for a bit, then put it in the freezer.


Oh, one side note. We were having friends over for dinner that night! Yes, that’s right. No power and the guest were about to arrive.


While the pie was cooling, I made risotto to go along with the short ribs Joe had been braising all day. I discovered cooking by candlelight is fun as long as you have a good bottle of wine by your side.


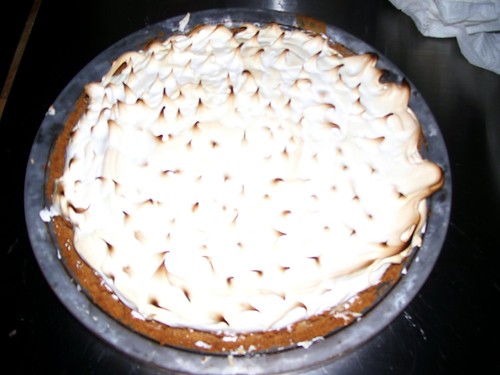
Back to the pie. After the pie was in the freezer for an hour, I took it out and made the meringue. I really did not care for this meringue recipe at all. I made it as directed and I found it to be overwhipped before it cooled. It looked broken and all together aweful. Into the garbage that meringue went, and I made my standby Swiss Meringue recipe from Martha Stewart.

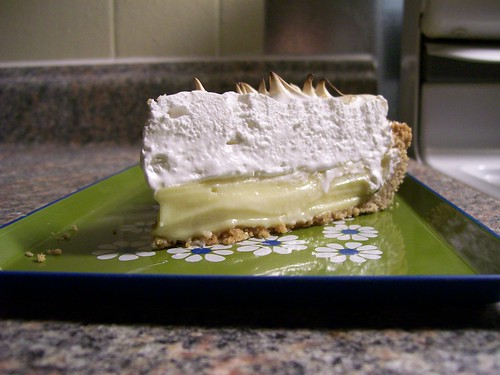
Our guests arrived with candles. We ended up having a great night with them. We sat in our living room discussing the food, the wines, places to live and visit in the future. The pie was excellent the perfect balance of sweet and tart.

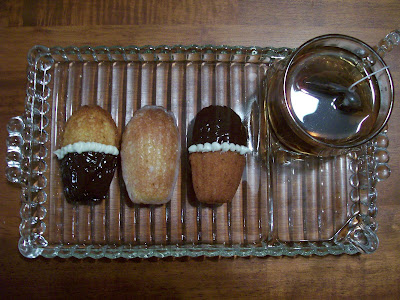
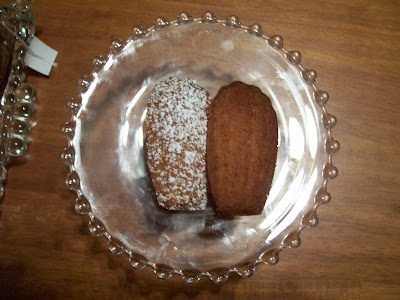
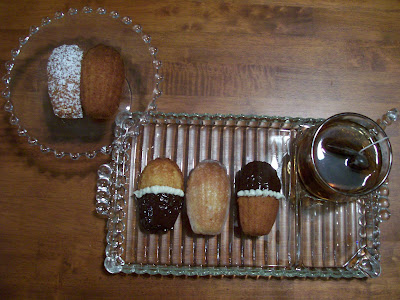
Here are final pictures of the pie. Sorry the lighting is a bit off, there was none!


Here’s the recipe. Keep in mind that I didn’t used the meringue recipe listed below, nor did I make the coconut cream. If you would like to make the meringue I did make, it can be found here:

http://www.marthastewart.com/portal/site/mslo/menuitem.fc77a0dbc44dd1611e3bf410b5900aa0/?vgnextoid=62d261876e70f010VgnVCM1000003d370a0aRCRD&autonomy_kw=swiss%20meringue&rsc=header_7"

Florida Pie
1 9-inch graham cracker crust (page 235), fully baked and cooled, or a store-bought crust
1 1/3 cups heavy cream
1 1/2 cups shredded sweetened coconut
4 large eggs, seperated
1 14-ounce can sweetened condensed milk
1/2 cup fresh Key (or regular) lime juice (from about 5 regular limes)
1/4 cup of sugar


Getting Ready:
Center a rack in the oven and preheat the oven to 350 degrees F. Put the pie plate on a baking sheet lined with parchment of a silicone mat.
Put the cream and 1 cup of the coconut in a small saucepan and bring it to a boil over medium-low heat, stirring almost constantly. Continue to cook and stir until the cream is reduced by half and the mixture is slightly thickened. Scrape the coconut cream into a bowl and set it aside while you prepare the lime filling.
Working with a stand mixer, preferably fitted with a paddle attachment, or with a hand mixer in a large bowl beat the egg yolks at high speed until thick and pale. Reduce the mixer speed to low and beat in the condensed milk. Still on low, add half of the lime juice. When it is incorporated, add the reaming juice, again mixing until it is blended. Spread the coconut cream in the bottom of the graham cracker crust, and pour over the lime filling.
Bake the pie for 12 minutes. Transfer the pie to a cooling rack and cool for 15 minutes, then freeze the pie for at least 1 hour.


To Finish the Pie with Meringue:
Put the 4 egg whites and the sugar in a medium heavy-bottomed saucepan and heat over medium-low heat, whisking all the while, until the whites are hot to the touch. Transfer the whites to a stand mixer, fitted with the whisk attachment, or use a hand mixer in a large bowl, and beat the whites at high speed until they reach room temperature and hold firm peaks. Using a rubber spatula, fold the remaining 1/2 cup coconut into the meringue.
Spread the meringue over the top of the pie, and run the pie under the broiler until the top of the meringue is golden brown. (Or, if you've got a blowtorch, you can use it to brown the meringue.) Return the pie to the freezer for another 30 minutes or for up to 3 hours before serving.
 

Bake-En Copyright 2009 Sweet Cupcake Designed by Ipiet Templates Image by Tadpole's Notez