The Craft of Baking by Karen Demasco is a lovely new baking book. I highly suggest these little sour cherry scones. They take seconds to make and are truly delicious. Cherries aren't in season YET, so I used frozen cherries which worked wonderfully.
Saturday, June 12, 2010
Craft of Baking Sour Cherry Scones
The Craft of Baking by Karen Demasco is a lovely new baking book. I highly suggest these little sour cherry scones. They take seconds to make and are truly delicious. Cherries aren't in season YET, so I used frozen cherries which worked wonderfully.
Monday, July 6, 2009
Sour Cream Coffee Cake
Nancy Silverton's recipe for coffee cake is by far the best I have come across. Made with crème fraiche, it is light with a beautiful crumb structure. Our 4th of July started early this year because my bocce partner Kady and I were playing at 10:00 AM in a bocce tournament. Knowing we would need a solid food foundation to start off our day of merriment; I decided to make the coffee cake for breakfast.
Lesson learned on this cake, use crème fraiche. I decided to make this cake last minute, so I didn't have time to make crème fraiche. Nancy says you can use sour cream, which I did. The resulting cake was much heavier and chewier than its crème fraiche variation. Everyone at the party loved it, but knowing how great it is with crème fraiche I couldn't help but be a bit disappointed.
Here's my adaptation of the recipe from Nancy Silverton's Pastries from La Brea Bakery
Crumb filling:
1 cup chopped walnuts (toasted)
¼ cup plus 2 Tb light brown sugar
2 tsp ground cinnamon
Mix above ingredients together, set aside.
Batter:
2 large eggs
2 cups crème fraiche (or sour cream)
1 tbsp vanilla
8 oz cold butter cubed
2 cups sugar
3 cups AP flour
1 Tb baking powder
1 tsp salt
Butter a 14-cup capacity bundt pan.
Preheat oven to 325.
In a bowl, mix dry ingredients. In another bowl whisk crème fraiche, eggs and vanilla together. In a mixing bowl paddle butter and sugar together till light and fluffy. Add the crème fraiche mixture to the creamed butter a little at a time till fully incorporated. Add the dry ingredients in 3 batches till fully incorporated. Put half the batter into the bundt pan using your fingers to smooth it out (wet fingers with water first, it makes it easy to spread). Scatter the brown sugar walnut crumbs all over the batter. Put the remaining batter on top of the crumbs, using wet fingers again to smooth it out. Bake for about an hour till firm to the touch.
Tuesday, June 30, 2009
Crepes with Quatre Epice Pastry Cream and Honey Ginger Apriums
Mornings spent with my husband are few and (too) far between. This morning I was so happy to wake up and see him there; I shot out of bed and started making us a celebratory breakfast. Knowing I had apriums to use; I immediately thought crepes. I reached for my copy of Lenotre's Desserts and Pastries for inspiration. There I found a recipe for poached whole apricots with honey and candied ginger, crepes Suzette and pastry cream; with those recipes as I starting point I began to tinker.
I halved the apriums and cooked them in 1 cup of water, 1/4 cup plus 1 T sugar, 1/4 cups honey and 1 T of chopped candied ginger.
Once they were cooked; I separated the liquid from the fruit and cooked the liquid down to a syrupy consistency then strained it.
I followed Lenotre's recipe for pastry cream except I added 1/4 tsp of quatre epice and about 1 T of butter.
I based my crepe batter on Lenotre's crepes Susette. Here it is:
40 g of unstalted butter
125g flour
40g oil
30g sugar
3 eggs
1 cup milk
Method:
Brown the butter. Mix flour, sugar, oil, eggs and 1/2 cup of milk till smooth in a bowl. Add the rest of the milk whisking well making sure there are no lumps. Let rest one hour. Cook the crepes for about 1 minute on each side.
To plate spread a little (or a lot) pastry cream on half a crepe, fold over then fold over again. Put 4 filled crepes on a plate. Top with poached apriums and the reduced sauce.
Wednesday, April 29, 2009
Sour Cream Braid
Ahh, the sour cream braid; so pretty, so delicious and so...easy. Easy? Surprisingly so. Beth Hensperger's Sour Cream Braid recipe is shockingly simple. By means of a food processor you can have your dough made in well under 15 minutes (including time to proof your yeast). Then all you have to do is proof the dough for an hour, braid it, proof again, egg wash and sprinkle with cardamom sugar and then bake. Seriously, it is as easy as it sounds. Anyone who's fearful of bread should put their fear aside and make this. You'll feel like a pro.
I followed the recipe nearly to the T. It calls for sour cream, but I used low fat sour cream because that's what I had on hand. Once the dough had proofed I divided the dough into 6 ropes and made two separate braids (I froze one). Lastly, I used demerara sugar instead of granulated in the sugar crust.
Overall this is excellent bread. It has a tight crumb, but is moist with a slight sweetness (due to the sugar crust). The demerara and cardamom made it interesting, but not unapproachable to a person who doesn't like that sort of fanciness. I will make this bread again.
Sour Cream Braid from Beth Hensperger's The Bread Bible
Dough
1/2 cup lukewarm water
2 1/2 tsps active dry yeast
2 tbsps plus 1/2 tsp sugar
1/2 cup cold milk
1/3 cup sour cream
1 large egg
1 tsp vanilla extract
1/2 tsp almond extract
3 cups AP flour
1/2 tsp salt
4 tbsp (1/2 stick) room temp unsalted butter cut into pieces
1. In a 1-cup-measure pour in the warm water. Sprinkle with yeast and 1/2 tsp sugar. Stir to dissolve
and let stand till foamy about 10 minutes.
In a small bowl whisk ingredients milk through almond extract together. Add the yeast mixture to the wet ingredients, stirring to combine.
2. In a food processor bowl with a blade combine flour, 2 tbsps sugar and salt. Dot the top with butter pieces. Process 10 seconds. With the motor running, pour the yeast-milk mixture through the feed tube in a steady stream. After the dough forms a soft, elastic ball and clears the sides of the bowl, process 45 seconds more to knead.
3. Transfer the dough to a lightly floured surface and give it a few kneads. Place the dough in a lightly greased container, cover with wrap. Let rise till doubled in bulk about 1 hour.
4. Divide dough into 3 portions (I did 6). Shape each into a 12" rope tapered at each end. Form into a braid.
Let proof till doubled in bulk about 45 minutes on your baking sheet lined with parchment paper.
Sugar Crust:
1 egg beaten with 1 tsp water
1 heaping tbsp sugar (use demerara, you won't regret it)
1/4 tsp ground cardamon
5. Twenty minutes before baking preheat oven to 375. Combine sugar and cardamom in a small bowl. Gently brush the surface of the dough with the egg glaze. Sprinkle sugar mixture all over dough.
Bake in the center of the oven for 35-40 minutes.
Monday, April 13, 2009
Easy Banana Walnut Bread
Sure, I have many Banana Bread recipes in my repertoire, but what's wrong with one more.
Today I made a double batch of Easy Banana Walnut Bread from King Arthur Flour Whole Grain Baking book. Easy? Yes. Delicious? Yes. So why not add another (healthy) banana bread recipe to your repertoire?
Easy Banana Walnut Bread from King Arthur Flour Whole Gain Baking
Here is a doubled version of the original recipe. The recipe below makes 2 9x5-inch loaves
1 cup (2 sticks, 8 oz) unsalted butter
1 cup packed light or dark brown sugar
1 ½ tsp baking soda
1 tsp salt
1 tsp ground cinnamon
½ tsp ground nutmeg
1 ½ tsp vanilla extract (I only increased this 50%, the original recipe called for 1 tsp)
3 cups (24 oz) mashed very ripe bananas
½ cup (6 oz) honey
4 large eggs
4 cups (1 lb) whole wheat flour
1 cup (4 oz) chopped walnuts.
Preheat 350 degrees. Grease 2 9x5-inch loaf pans.
Beat butter, sugar, soda, salt, cinnamon, nutmeg and vanilla till smooth. Add banana, honey and eggs beating till smooth. Add flour and nuts, stir till smooth. Spoon into prepared pans. Let rest at room temp for 10 minutes (I forgot to do this, so my breads were a little flat).
Bake for 50 minutes. Lay a piece of foil over top (I didn’t do this) and bake till a cake tester comes out clean 10 to 15 minutes more. Let cool 10 minutes then remove from pan.
Tuesday, March 24, 2009
TWD Mixed Berry Brown Butter Crumb Cake
Sihan of Befuddlement chose Blueberry Crumb Cake as our weekly recipe from Baking: From my home to yours.
Today is Joe and my anniversary, so I thought this would be a lovely way to start the day. The recipe is simple. First you make the crumb topping, then the cake. I decided to make a brown butter crumb topping because I love the combination of berries and brown butter. To make the topping, I simply followed Dorie's directions for the crumble except I browned the butter, poured it onto the dry ingredients and mixed it by hand.
Then I crumpled it up with my hands and laid the crumbs out on a plate which I put in the freezer. For the cake, the one thing I omitted was the lemon zest because Joe hates lemon zest. Usually I'll add lemon zest anyway because I love it so much, but since today is all about our love for each other; I decided to leave it out. I used the fancy berry mix from Trader Joe's instead of just blueberries. It contains blueberries, blackberries and raspberries. I find this brand of frozen berries to be consistantly good. One of my favorite ways to eat the mix is to microwave ½ cup of it in a bowl, then top it with Greek yogurt and a little maple syrup. It's heavenly.
Back to the cakes.
Originally I had grandios ideas of making a two tiered crumb cake as kind of a faux wedding cake. I divided the cake mix into one 4" round and a 6" round. After 55 minutes in the oven, I was glad I had made a 4" cake because it was done way earlier than the 6". I think the 6" cake ended up in the oven for at least an hour and 10 minutes. Joe and I are very impatient people. Especially when we've already had our coffee hours ago, and are staring at a very pretty 4" cake.
With cake aroma swirling around us, I decided to forgo the 2 tiered cake idea and dig into the little guy. We were glad we did because it was lovely warm.
Just another delicious recipe from Dorie Greenspan. I loved the contrast between the berries, the soft cake and the crumble. This is something I will make again.
Tuesday, October 21, 2008
TWD Pumpkin Muffins
It's that time of the year again. The leaves on the trees have changed, all the bakeries are selling hot mulled cider and pumpkin is showing up on every menu in the Boston area. I have a love hate relationship with pumpkin. I love pumpkin breads and muffins. I love carving pumpkins for Halloween. The only problem with pumpkin is pumpkin pie. The only reason pumpkin pie's a problem is because we're going to be making literally hundreds of pumpkin pies next month! It's not that I hate pumpkin pie, I'm just not a fan of the anxiety I feel when I think about the logistics of baking hundreds of pies. Oh yeah, did I mention we're making our own pumpkin puree? No cans for us, we're a hard core bakery and we only use the freshest ingredients. Next month is going to be a whirl wind of pumpkin and pie dough. It's going to be so much fun, I can't wait to see how it all works out.
Why all this talk of pumpkin? Because Kelly of Sounding My Barbaric Gulp chose pumpkin muffins as this week's TWD recipe. The recipe was really easy to make, and I followed it to a T except I didn't add nuts or raisins. I was surprised by how thick the batter was. I've been making a lot of breads/muffins lately that use canola oil so I'm used to a wetter batter. This one was very thick.
Surprisingly, I didn't like these muffins. I am pretty sure that I overbaked them after reading what other people wrote about this recipe. Foolishly, I decided to would squeeze a quick shower in between putting them in the oven and taking them out. I got back just in the nick of time to take them out at 24 minutes. They were certainly done at that point, so I'm sure I could have taken them out earlier. It seems like other TWD'ers really liked this recipe though, so I'll have to try again soon.
Tuesday, September 23, 2008
TWD Dimply Plum Cake
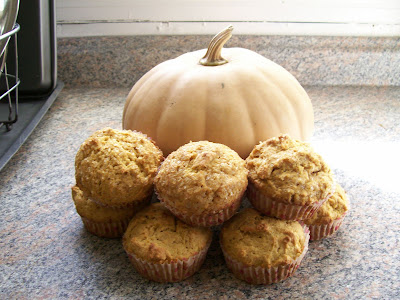
It was my turn to choose this week's TWD recipe. Exciting? Yes. Difficult? You bet! There are so many fantastic recipes in this book, it was nearly impossible to choose one recipe. I decided on the plum cake because I love plums and cardamom is one of my favorite spices. Also, I've been very busy with work and travel lately, so I decided it would be safe to choose an easy recipe that I could throw together quickly.
Wow, I'm so thankful I choose such an easy recipe. In addition to working 14 hour days at the bakery; last week I went to a Star Chef conference in NYC for two days, and then Joe and I went to NYC again Sunday returning late last night. Both trips were great. I hope to post about the conference sometime today, it was amazing. Yesterday we had a nice lunch at David Burke and Donatella, and afterwards I shopped around while Joe went to an appointment. We got home late last night, and skipped dinner because we were still stuffed from lunch.
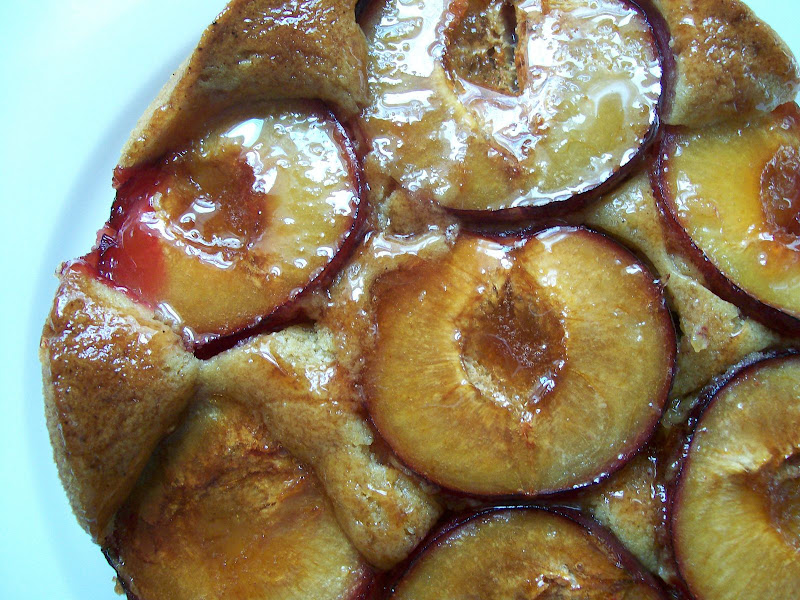
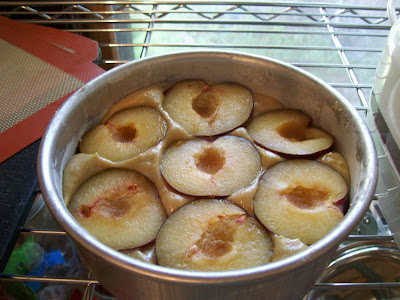
Back to the plum cake. First off, I decided to halve the recipe. Both Joe and I have been consuming copious amounts of baked goods since Sofra opened, so I decided we didn't exactly "need" 8 servings of this cake! I baked the cake in a 6" round cake pan, which worked out perfectly. I think the cake may have been slightly shorter than Dorie's, but I wanted to fit more plums on top of the cake and I knew my 4" pan would only hold about 5 plum halves. The recipe was easy to make. Cream butter and sugar, add egg(s), add oil, zest, and vanilla; and finally add dry ingredients till just incorporated.
I scraped the batter into my cake pan, leveled it out a bit, and then topped it with 7 plum halves (I couldn't squeeze the last one in).
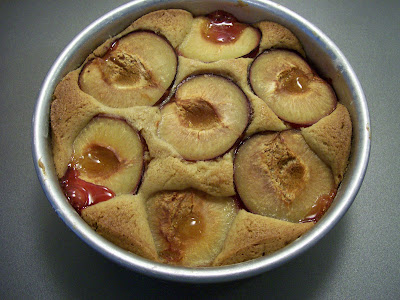
My bake time was surprisingly longer than Dorie suggested. I baked the cake for just over 45 minutes at 350.
When the cake came out of the oven, I was slightly disappointed with how dry the plums looked.
I decided to beautify it by making a plum cardamom glaze. What I did was I cut a plum up into small pieces and put it in a pan with some sugar, once the sugar started to melt, I added two fresh cardamom seeds and a little bit of brandy.
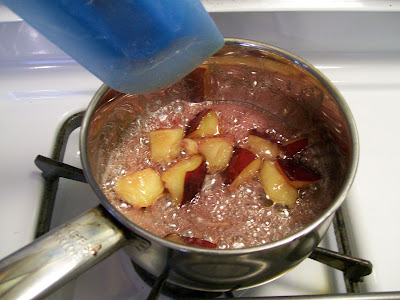
I left the skin on the plums because I love the color that plum skin leaches while cooking. Next I went to the dining room to pay bills. Having forgotten about my plum glaze, I came back to a nicely caramelized plum glaze (phew)! I wish every time I forgot about something on the stovetop that would happen! I added a little bit of water to thin out my glaze and topped the cake with it.
Appearance wise, I think the glaze made this a really beautiful cake.
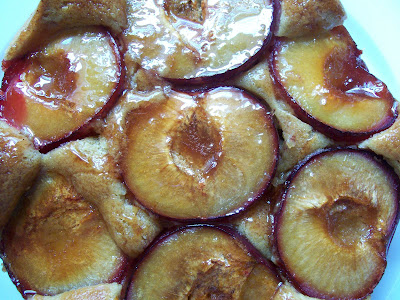
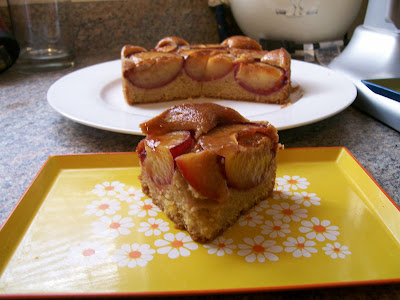
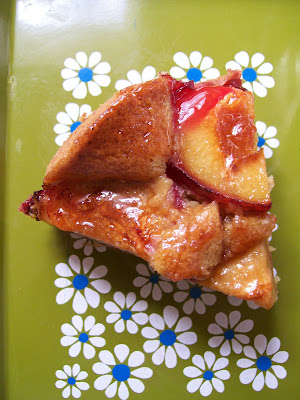
It's the kind of cake I would want to buy at a bakery based on appearance. I swear my pictures don't even come close to showing just how pretty this cake was. Overall though, I wasn't blown away by the cake itself. I have a feeling it's because my plums weren't that great. There were hundreds of purple plums at the grocery store, but they were all rock hard. I chose the ripest of the lot, but that's not saying much. I will certainly make this cake again when I can find some beautiful plums. I have a feeling that will make a huge difference in the overall flavor of the cake. Also, I'm interested to see what this cake tastes like tomorrow. Dorie says that the first day the cake is like corn bread and the 2nd and 3rd days it's soft and moist. Perhaps I'll fall in love with it tomorrow.
Just a side note. If you have David Lebovitz's book Ripe for Dessert try his recipe for a yeasted plum tart with red wine-plum sauce. It's a fantastic plum recipe. Also, today I plan on catching up on some posts. Check out my posts on both Sofra and the Star Chefs Conference.
Here's the recipe from Dorie Greenspan's Baking: from my home to yours
Dimply Plum Cake (page 41)
1 ½ C AP Flour
2 tsp Baking Powder
¼ tsp salt
Scant ¼ tsp ground cardamom (optional)
5 Tbsp Unsalted butter, room temp
¾ C Packed light brown sugar
2 large eggs
1/3 C flavorless oil, such as canola or safflower
Grated zest of 1 orange
1 ½ tsp pure vanilla extract
8 purple of red plums (in the fall, use Italian prune plums), halved and pitted
Getting Ready: center a rack in the oven and preheat the oven to 350 degress F. Butter an 8-inch square baking pan, dust the inside with flour, tap out the excess and put the pan on a baking sheet.
Whisk the flour, baking powder; salt and cardamom, if you're using it, together.
Working with a stand mixer, preferably fitted with a paddle attachment, or with a hand mixer in a large bowl, beat the butter at medium speed until soft and creamy, about 3 minutes. Add the sugar and beat for another 2 minutes. Add the eggs one at a time, beating for a mixture after each addition. On medium speed, beat in the oil, orange zest and vanilla. The batter will look very light and smooth, almost satiny. Reduce the mixer speed to low and add the dry ingredients, mixing only till they're incorporated.
Run a spatula around the bowl and under the batter, just to make sure there are no dry spots, then scrape the batter into the pan and smooth the top. Arrange the plums cut side up in the batter-I usually make 4 rows of 4 plum halves each-jiggling the plums a tad just so they settle comfortably into the batter.
Bake for about 40 minutes, or until the top is honey brown and puffed around the plums and a thin knife inserted into the center of the cake comes out clean. Transfer the cake to a rack and cool for 15 minutes-during which time the plums' juice will return to the fruit-then run a knife around the sides of the pan and unmold the cake. Invert and cool right side up.
Tuesday, July 1, 2008
TWD Apple Cheddar Scones
Karina of The Floured Apron chose apple cheddar scones as this weeks TWD recipe. The heat and humidity in Boston this week has been awful. I had to wake up at 5:00 to make these because I knew my kitchen wouldn't be too hot then.
This recipe is really easy, and I followed it pretty much as written. The only changes I had to make were I finely chopped a granny smith apple in place of the dried apple. I also pureed apple in my food processor because I didn't have apple juice. I was afraid the pureed apple wouldn't result in enough liquid, but it worked out fine. The only comment I have on making these is expect a very sticky dough. It's hard to shape into a rectangle because it's so sticky. I ended up shaping it into a rectangle and cutting them with my bench scraper. The resulting scones would not have been pretty; so I heavily floured a round cookie cutter, and I squished the scones into that to get a round shape.
I really liked these scones. I wish the apple flavor was more pronounced, but I'm sure if I had used dried apples it would have been. The scones were extremely tender and delicious warm. Next time I make these, I'll grate an extra ¼ cup of cheese, and sprinkle cheese on top of the scones before baking.
Side note, I'm having major problems with blogger and my computer. I haven't been able to post more than a couple of comments on other people's blogs without getting mulitiple error messages. I've contacted blogger, and they're working on the problem. I have been looking at everyone's blogs though, and everyone is so inspiring. Hopefully I can get this problem fixed soon, and I'll be back to commenting on your beautiful work!
Here are some pictures:
The chopped apple:
Dry Ingredients:
The pureed apple:
Before going in the oven:
Wow, the baking soda and powder sure worked:
Apple Cheddar Scones in all their glory:
Tuesday, May 27, 2008
TWD Pecan Honey Sticky Buns
1. I would marry these sticky buns if I could.
2. I think my friends would marry me if I promised to make sticky buns for them daily till death do we part.
3. Move over Salt & Vinegar potato chips, Dorie's sticky buns are my latest hangover cure! Don't worry coffee, you're irreplacable.
I had a lot of fun making these, but even more fun sharing them with my friends this morning. Thanks to Mike and LT for hosting yet another amazing party. Congrats to LT for finishing her first half marathon by 10:30, playing bocce by noon and staying up till just before midnight. You are my hero :)
Here are pictures of the sticky buns from start to finish:
The brioche dough mixing:
Brioche after mixing:
The next day, dough rolled out:
Butter, cinnamon and sugar added:
Rolled up dough:
At this point, I froze the dough and then took it out the day before I baked it off.
The rolls before proofing:
After proofing and right before going in the oven:
Here are the beautiful results:
The last piece: